
만족
[Nextjs] 로컬 개발 환경(localhost)에 https 적용하기 본문
[Nextjs] 로컬 개발 환경(localhost)에 https 적용하기
FrontEnd/Nextjs Satisfaction 2022. 7. 24. 19:08https이 적용된 상태에서만 정상 작동하는 동작들이 있다.
이 포스트에서는 로컬에서 https를 적용하는 방법을 알아본다.
아이디어
우리가 https 가 적용된 웹사이트에 접속할 때 어떤 일이 일어날까?
https://nuritech.tistory.com/25
HTTPS 통신 원리 쉽게 이해하기 (Feat. SSL Handshake, SSL 인증서)
이 글을 쓰게 된 이유는,, 나의 평소 HTTPS 에 대한 지식은 HTTPS 가 암호화된 네트워크 통신 프로토콜이고 HTTPS 를 사용한 네트워크 통신에서는 주고받는 패킷을 까도 데이터가 암호화되어 있어 안
nuritech.tistory.com
암/복호화 부분을 제외하고 살펴보면
1. 서버가 클라이언트에게 인증서를 제시
2. 클라이언트는 인증 기관(CA)에게 인증서 검증
부분을 주목해야 한다.
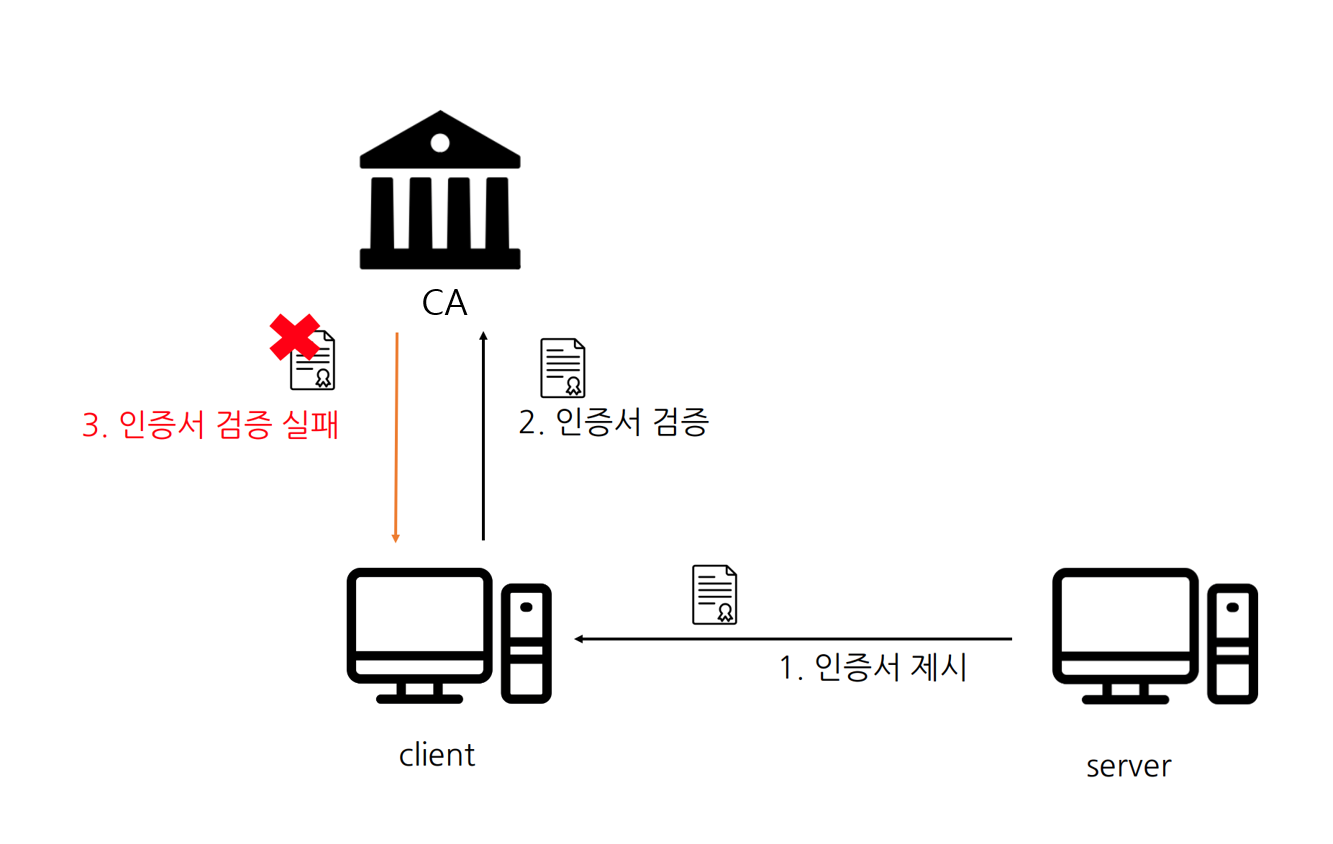
https 적용을 위해 우리가 임의로 발급한 인증서는 당연히 유효한 인증 기관에 등록되어있을리 없으므로,
직접 임의의 인증 기관을 컴퓨터에 설치하여(해당 컴퓨터에서만 유효)
그 인증 기관으로부터 발급받은 인증서를 사용하는 것이다.

인증 기관 설치 및 인증서 발급
localhost 라는 도메인에 적용한다고 가정한다.
먼저 windows의 경우 chocolatey, Mac의 경우 brew를 설치한다.
# windows
choco install mkcert

# mac
brew install mkcert
인증 기관 설치 및 인증서 발급을 위해 mkcert를 사용할 것이므로 설치한다.
mkcert -install로컬 인증 기관을 컴퓨터에 설치한다.
다시 강조하지만 이것은 해당 컴퓨터에서만 유효하다.
따라서 프로덕션 환경에서는 사용할 수 없고, 개발 환경에서 테스트 목적으로만 활용해야 한다.
mkcert localhost
localhost(도메인)에 대한 key, cert를 현재 경로에 생성한다.
생성 파일의 경로를 특정하고 싶다면 아래와 같이 한다.
mkcert -key-file PATH -cert-file PATH localhost
프로젝트에 적용
nextjs 프로젝트에 적용하기 위해 custom server를 사용해야 한다.
기본 상태에서는 next dev 스크립트를 이용해 개발 환경을 구동했다면,
server.js 를 만들고 그것을 실행시킬 것이다.
https://nextjs.org/docs/advanced-features/custom-server
Advanced Features: Custom Server | Next.js
Start a Next.js app programmatically using a custom server.
nextjs.org
프로젝트 루트에 server.js를 만든다
// server.js

const http = require("http");
const { parse } = require("url");
const next = require("next");

const dev = process.env.NODE_ENV !== "production";
const app = next({ dev });
const handle = app.getRequestHandler();

const PORT = 3000;

app.prepare().then(() => {
  http
    .createServer((req, res) => {
      // Be sure to pass `true` as the second argument to `url.parse`.
      // This tells it to parse the query portion of the URL.
      const parsedUrl = parse(req.url, true);
      handle(req, res, parsedUrl);
    })
    .listen(PORT, (err) => {
      if (err) throw err;
      console.log(`> Ready on http://localhost:${PORT}`);
    });
});
현재는 http.createServer만 있어서 http://localhost:3000 으로 접근 가능한 상태다.
https.createServer도 적용시켜 주자
  const https = require("https");
  const fs = require("fs");
  const options = {
    key: fs.readFileSync("{PATH/TO/CERTIFICATE-KEY-FILENAME}.pem"),
    cert: fs.readFileSync("{PATH/TO/CERTIFICATE-FILENAME}.pem"),
  };
  https
    .createServer(options, function (req, res) {
      // Be sure to pass `true` as the second argument to `url.parse`.
      // This tells it to parse the query portion of the URL.
      const parsedUrl = parse(req.url, true);
      handle(req, res, parsedUrl);
    })
    .listen(PORT + 1, (err) => {
      if (err) throw err;
      console.log(`> Ready on https://localhost:${PORT + 1}`);
    });
위 코드 블럭을 app.prepare 안쪽에 넣어 주면 최종적으로
http://localhost:3000
https://localhost:3001
로 접근할 수 있게 된다.
+ PATH/TO/CERTIFICATE-FILENAME 쪽은 경로, 파일명에 맞춰 지정해 준다.
+ key파일은 localhost-key.pem 처럼 파일명에 -key가 붙고, cert는 없다.
// server.js
const http = require("http");
const { parse } = require("url");
const next = require("next");
const dev = process.env.NODE_ENV !== "production";
const app = next({ dev });
const handle = app.getRequestHandler();
const PORT = 3000;
app.prepare().then(() => {
http
.createServer((req, res) => {
// Be sure to pass `true` as the second argument to `url.parse`.
// This tells it to parse the query portion of the URL.
const parsedUrl = parse(req.url, true);
handle(req, res, parsedUrl);
})
.listen(PORT, (err) => {
if (err) throw err;
console.log(`> Ready on http://localhost:${PORT}`);
});
const https = require("https");
const fs = require("fs");
const options = {
key: fs.readFileSync("{PATH/TO/CERTIFICATE-KEY-FILENAME}.pem"),
cert: fs.readFileSync("{PATH/TO/CERTIFICATE-FILENAME}.pem"),
};
https
.createServer(options, function (req, res) {
// Be sure to pass `true` as the second argument to `url.parse`.
// This tells it to parse the query portion of the URL.
const parsedUrl = parse(req.url, true);
handle(req, res, parsedUrl);
})
.listen(PORT + 1, (err) => {
if (err) throw err;
console.log(`> Ready on https://localhost:${PORT + 1}`);
});
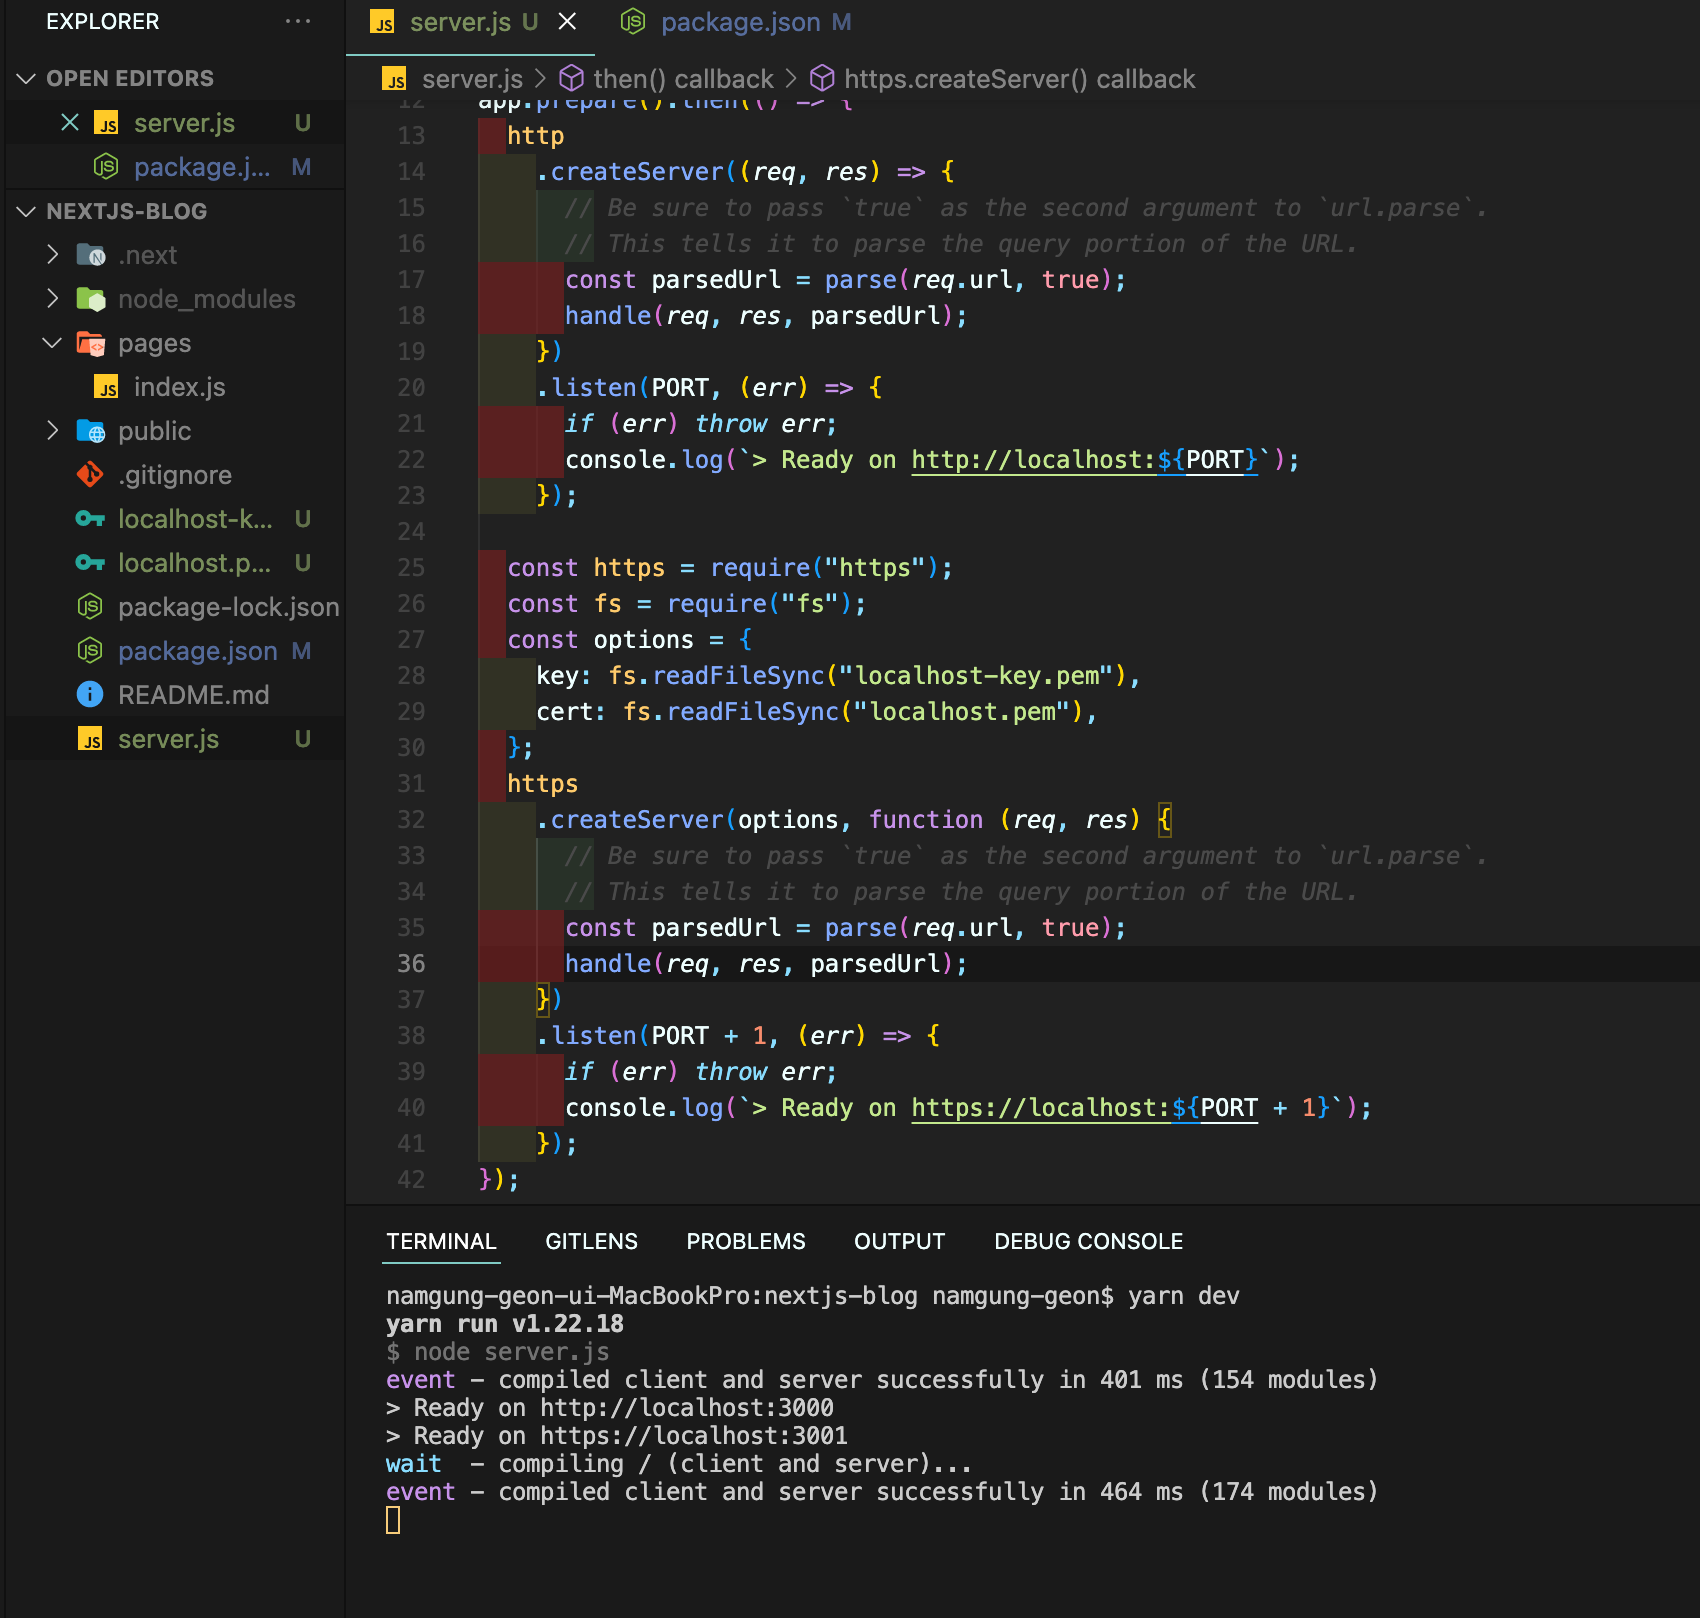
});server.js 는 최종적으로 위와 같은 모습이 된다.
만약 http, https에 대해 핸들 전 동일한 동작을 하고 싶다면
function (req, res) { 부분을 따로 빼면 되겠다.

이제 package.json으로 가서,
dev스크립트를 next dev-> node server.js로 바꿔 준다.
이제 yarn dev를 입력하면, 아래와 같이 성공적으로 localhost에 http, https로 접근할 수 있다.
인증 기관 설치 및 인증서 발급 자동화
여러 명이 함께 참여하는 프로젝트에서는 이런 과정의 자동화가 필요하다.
레포에 단순히 인증서 올리면 끝 아니냐? 할 수 있지만,
본인의 컴퓨터에 설치된 로컬 인증 기관이 설치되어있지 않으므로 레포에 인증서를 올리는 행위는 의미가 없다.
따라서 쉘스크립트를 이용해 이런 과정을 자동화할 것이다.
+ server.js 는 미리 만들어두어야 한다.
맥 기준으로, init-https.sh 를 만들고
#!/bin/bash

MKCERT_INSTALLED=$(which mkcert)

if [ -z $MKCERT_INSTALLED ];then
    brew install mkcert
fi

mkcert -install
mkcert localhost
위 내용을 붙여넣은 다음 package.json에 실행문을 등록한다

이제 https를 사용하기 위해 복잡한 스크립트를 타이핑할 필요 없이
yarn init-https 를 입력하여 작업을 완료할 수 있다.

생성한 인증서/키 파일은 로컬이 아니면 의미 없으므로,
.gitignore에도 등록해 준다.
Hot reload가 정상 작동하지 않는 문제
http와 https로 로컬을 동시에 접속하면 한쪽에서 hot reload가 정상 작동하지 않는다.
(https://localhost로 접속하면 이후 http://localhost는 비정상 동작)
원인은 아직도 찾지 못했고, 한쪽으로만 접속하면 된다.
'FrontEnd > Nextjs' 카테고리의 다른 글
| [Nextjs] bfcache로 페이지가 복원되었을 때 브라우저에 따라 라우터가 업데이트되거나 업데이트되지 않는 현상 (0) | 2023.01.01 |
|---|---|
| [Nextjs] express 프로젝트에 Nextjs 추가하기 (0) | 2021.08.21 |

